はじめに
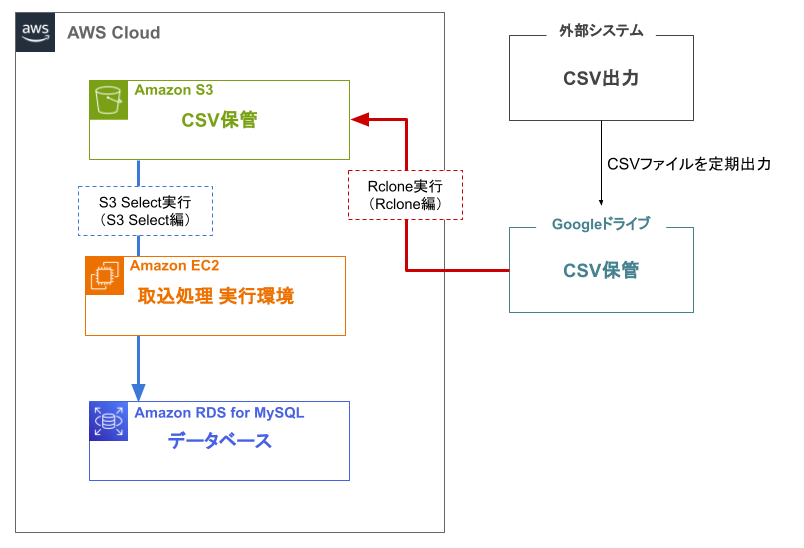
今回、事業部の取り組みとしてCSV出力によるエクスポートが可能な社内の電子帳簿保存システムと販売管理システムのデータをAWS基盤に取り込み、一元的に情報を確認できるアプリケーションの開発を行っています。そこで、RPAによってGoogleドライブに日次で出力されるCSVファイルをAmazon Simple Storage Service(Amazon S3、以下「S3」と記載)にコピーし保管したい、保管しているCSVデータをデータベースに取り込みたいという要望がありました。また、Googleドライブ内のCSVを日次でS3に取り込む作業を自動化することで、手動実行の手間を削減したいと思い、定期実行のプログラムの実装を行いました。
本記事では、GoogleドライブからS3にファイルをコピーするためのRcloneの設定方法と、SpringBootを用いた定期実行について解説します。
また本記事(Rclone編)は、下記のリンクに記載のS3 Select編との2部構成となっており、外部のストレージサービスに保管されているCSVファイルをS3にコピーし、ファイル内のデータをRDSに反映させるまでの処理と処理の自動化について解説しています。
S3からRDSへのデータ取り込みについては下記のS3 Select編をご覧ください。
【AWS】Rclone × S3 Selectによるデータ取り込み自動化で効率的なデータ活用を実現!~S3 Select編~
なぜRcloneを選んだのか
GoogleドライブからS3へのファイルの複製はLambdaでも実装可能ですが、Lambdaを使用する場合はプログラム実装が必要となります。その点でRcloneの場合はGoogleドライブとS3の情報を対話形式で設定することで実装することができ、また実装例も多いことから今回はRcloneを使用しての実装を選択しました。
環境
- Windows10
- WSL(Ubuntu 20.04.6 LTS (GNU/Linux 4.4.0-19041-Microsoft x86_64))
- Java 17.0.9
- SpringBoot 3.2.2
- AWS SDK for Java 2.23.3(S3 Select編で使用)
- openCSV 5.7.1(S3 Select編で使用)
- MyBatis 3.0.3(S3 Selectで編使用)
事前準備
- AWS IAMユーザの作成(アクセスキーとシークレットアクセスキーのメモを忘れずに!)
参考:AWS アカウント での IAM ユーザーの作成 - CSVの取込先となるS3バケットの作成
- データベースの作成
- Googleアカウントの作成
- GoogleCloudにアクセスし、クライアントIDとクライアントシークレットを発行(GCPのアクセス権があることも確認)
参考:Googleドライブ クライアントID作成方法
Rcloneの実行
Rcloneとは
Rcloneは、70以上のさまざまなクラウドストレージサービスと連携し、サービス間でファイルやディレクトリを同期することができるコマンドラインツールです。
参考:Rclone公式サイト
Rcloneのインストール
実行環境(今回の場合はAmazon EC2)にログインし以下のコマンドを実行
$ curl https://rclone.org/install.sh | sudo bashRcloneにS3を設定
$ rclone config を実行
▼設定詳細を表示
Current remotes:

Name                 Type
====                 ====

#S3にアクセスするための設定を作成
No remotes found, make a new one?
n) New remote
s) Set configuration password
q) Quit config
n/s/q> n    #新しいリモートを設定するためnを選択

#リモート名の設定
Enter name for new remote.
name> s3    #任意の名前を入力

#接続するストレージを選択
Option Storage.
Type of storage to configure.
Choose a number from below, or type in your own value.
 1 / 1Fichier
   \ (fichier)
 2 / Akamai NetStorage
   \ (netstorage)
 3 / Alias for an existing remote
   \ (alias)
 4 / Amazon Drive
   \ (amazon cloud drive)
 5 / Amazon S3 Compliant Storage Providers including AWS, Alibaba, ArvanCloud, Ceph, ChinaMobile, Cloudflare, DigitalOcean, Dreamhost, GCS, HuaweiOBS, IBMCOS, IDrive, IONOS,
LyveCloud, Leviia, Liara, Linode, Minio, Netease, Petabox, RackCorp, Rclone, Scaleway,
SeaweedFS, StackPath, Storj, Synology, TencentCOS, Wasabi, Qiniu and others
~省略~
Storage> 5    #今回はS3を使用するため5を選択

#プロバイダの選択
Option provider.
Choose your S3 provider.
Choose a number from below, or type in your own value.
Press Enter to leave empty.
 1 / Amazon Web Services (AWS) S3
   \ (AWS)
 ~省略~
provider> 1    #プロバイダはAWSのため1を選択

#認証情報の確認方法
Option env_auth.
Get AWS credentials from runtime (environment variables or EC2/ECS meta data if no env
vars).
Only applies if access_key_id and secret_access_key is blank.
Choose a number from below, or type in your own boolean value (true or false).
Press Enter for the default (false).
 1 / Enter AWS credentials in the next step.
   \ (false)
 2 / Get AWS credentials from the environment (env vars or IAM).
   \ (true)
env_auth> 2    #認証情報は入力するため2を選択

#認証情報の入力
Option access_key_id.
AWS Access Key ID.
Leave blank for anonymous access or runtime credentials.
Enter a value. Press Enter to leave empty.
access_key_id> ○○○○○○○○    #AWS IAM セキュリティ情報にあるアクセスキーを入力

#認証情報の入力
Option secret_access_key.
AWS Secret Access Key (password).
Leave blank for anonymous access or runtime credentials.
Enter a value. Press Enter to leave empty.
secret_access_key> ××××××××    #IAMユーザ作成時に表示されるシークレットアクセスキー(作成したタイミングでのみの表示のため要確認)を入力

#リージョンの選択
Option region.
Region to connect to.
Choose a number from below, or type in your own value.
Press Enter to leave empty.
 ~省略~
   / Asia Pacific (Tokyo) Region.
14 | Needs location constraint ap-northeast-1.
   \ (ap-northeast-1)
   / Asia Pacific (Seoul).
15 | Needs location constraint ap-northeast-2.
   \ (ap-northeast-2)
   / Asia Pacific (Osaka-Local).
16 | Needs location constraint ap-northeast-3.
   \ (ap-northeast-3)
~省略~
region> 14    #今回は東京リージョンを選択

#エンドポイントの設定
Option endpoint.
Endpoint for S3 API.
Leave blank if using AWS to use the default endpoint for the region.
Enter a value. Press Enter to leave empty.
endpoint>    #デフォルトのS3 APIエンドポイントを使用するため入力しない

#ロケーション制約の設定(リージョンと同じものを選択)
Option location_constraint.
Location constraint - must be set to match the Region.
Used when creating buckets only.
Choose a number from below, or type in your own value.
Press Enter to leave empty.
 ~省略~
13 / Asia Pacific (Sydney) Region
   \ (ap-southeast-2)
14 / Asia Pacific (Tokyo) Region
   \ (ap-northeast-1)
15 / Asia Pacific (Seoul) Region
   \ (ap-northeast-2)
~省略~
location_constraint> 14    #今回は東京リージョンを選択

#ACLの設定
Option acl.
Canned ACL used when creating buckets and storing or copying objects.
This ACL is used for creating objects and if bucket_acl isn't set, for creating buckets too.
For more info visit https://docs.aws.amazon.com/AmazonS3/latest/dev/acl-overview.html#canned-acl
Note that this ACL is applied when server-side copying objects as S3
doesn't copy the ACL from the source but rather writes a fresh one.
If the acl is an empty string then no X-Amz-Acl: header is added and
the default (private) will be used.
Choose a number from below, or type in your own value.
Press Enter to leave empty.
   / Owner gets FULL_CONTROL.
 1 | No one else has access rights (default).
   \ (private)
   / Owner gets FULL_CONTROL.
 2 | The AllUsers group gets READ access.
   \ (public-read)
~省略~
acl> 1    #ACLはprivateにするため1を選択

#サーバーサイドの暗号化の設定
Option server_side_encryption.
The server-side encryption algorithm used when storing this object in S3.
Choose a number from below, or type in your own value.
Press Enter to leave empty.
 1 / None
   \ ()
 2 / AES256
   \ (AES256)
 3 / aws:kms
   \ (aws:kms)
server_side_encryption> 1    #サーバーサイドの暗号化は使用しないため1を選択

#KMSキーの設定
Option sse_kms_key_id.
If using KMS ID you must provide the ARN of Key.
Choose a number from below, or type in your own value.
Press Enter to leave empty.
 1 / None
   \ ()
 2 / arn:aws:kms:*
   \ (arn:aws:kms:us-east-1:*)
sse_kms_key_id> 1    #KMSキーは使用しないため1を選択

#ストレージクラスの設定
Option storage_class.
The storage class to use when storing new objects in S3.
Choose a number from below, or type in your own value.
Press Enter to leave empty.
 1 / Default
   \ ()
 2 / Standard storage class
   \ (STANDARD)
 ~省略~
storage_class> 2    #ストレージクラスはスタンダードを使用するため2を選択

#詳細設定を行うかの選択
Edit advanced config?
y) Yes
n) No (default)
y/n> n    #詳細設定は行わないためnを選択

#設定完了
Configuration complete.
Options:
- type: s3
- provider: AWS
- env_auth: true
- access_key_id: アクセスキー
- secret_access_key: シークレットアクセスキー
- region: ap-northeast-1
- location_constraint: ap-northeast-1
- acl: private
- storage_class: STANDARD
Keep this "s3" remote?
y) Yes this is OK (default)
e) Edit this remote
d) Delete this remote
y/e/d> y    #設定内容に問題なければyを選択

Current remotes:

Name                 Type
====                 ====
s3                   s3    #作成したものが表示される

e) Edit existing remote
n) New remote
d) Delete remote
r) Rename remote
c) Copy remote
s) Set configuration password
q) Quit config
e/n/d/r/c/s/q> q    #上部にS3が表示されていればOK、qを選択
RcloneにGoogleドライブを設定
再度 $ rclone config を実行
※S3設定時と重複する部分は説明省略します。
▼設定詳細を表示
Current remotes:

Name                 Type
====                 ====
s3                   s3

e) Edit existing remote
n) New remote
d) Delete remote
r) Rename remote
c) Copy remote
s) Set configuration password
q) Quit config
e/n/d/r/c/s/q> n

Enter name for new remote.
name> google-drive

Option Storage.
Type of storage to configure.
Choose a number from below, or type in your own value.
~省略~
18 / Google Drive
   \ (drive)
~省略~
Storage> 18

#GoogleCloudの認証情報
Option client_id.
Google Application Client Id
Setting your own is recommended.
See https://rclone.org/drive/#making-your-own-client-id for how to create your own.
If you leave this blank, it will use an internal key which is low performance.
Enter a value. Press Enter to leave empty.
client_id> ○○○○○○○○    #GoogleCloudで発行したクライアントID

#GoogleCloudの認証情報
Option client_secret.
OAuth Client Secret.
Leave blank normally.
Enter a value. Press Enter to leave empty.
client_secret> ××××××××    #GoogleCloudで発行したクライアントシークレット

#ファイルへのアクセス範囲の設定
Option scope.
Comma separated list of scopes that rclone should use when requesting access from drive.
Choose a number from below, or type in your own value.
Press Enter to leave empty.
 1 / Full access all files, excluding Application Data Folder.
   \ (drive)
 2 / Read-only access to file metadata and file contents.
   \ (drive.readonly)
~省略~
scope> 2    #今回は読み取りだけのため2を選択

#サービスアカウントの設定
Option service_account_file.
Service Account Credentials JSON file path.
Leave blank normally.
Needed only if you want use SA instead of interactive login.
Leading `~` will be expanded in the file name as will environment variables such as `${RCLONE_CONFIG_DIR}`.
Enter a value. Press Enter to leave empty.
service_account_file>    #使用しないため何も入力せずにEnter

Edit advanced config?
y) Yes
n) No (default)
y/n> n

#Rcloneの自動認証をするか選択
Use web browser to automatically authenticate rclone with remote?
 * Say Y if the machine running rclone has a web browser you can use
 * Say N if running rclone on a (remote) machine without web browser access
If not sure try Y. If Y failed, try N.

y) Yes (default)
n) No
y/n> n    #手動で認証を行うためnを選択

#Rcloneの認証(以下で別途解説あり)
Option config_token.
For this to work, you will need rclone available on a machine that has
a web browser available.
For more help and alternate methods see: https://rclone.org/remote_setup/
Execute the following on the machine with the web browser (same rclone
version recommended):
        rclone authorize "drive" "~~~"
Then paste the result.
Enter a value.
config_token> ○○○○○○○○
Configure this as a Shared Drive (Team Drive)?

y) Yes
n) No (default)
y/n> y    #共有ドライブの設定が問題なければyを選択

#使用するドライブの設定
Option config_team_drive.
Shared Drive
Choose a number from below, or type in your own string value.
Press Enter for the default (0APIj9wqnJalTUk9PVA).
 1 / ○○○○○○○○
   \ (○○○○○○○○)
 2 / ××××××
   \ (××××××)
config_team_drive> 1    #共有ドライブ一覧から使用するフォルダを選択

Configuration complete.
Options:
- type: drive
- client_id: ○○○○○○○○
- client_secret: ××××××××
- token: {"access_token":○○○○}- team_drive:××××
- root_folder_id:
Keep this "google-drive" remote?
y) Yes this is OK (default)
e) Edit this remote
d) Delete this remote
y/e/d> y

Current remotes:

Name                 Type
====                 ====
google-drive         drive
s3                   s3

e) Edit existing remote
n) New remote
d) Delete remote
r) Rename remote
c) Copy remote
s) Set configuration password
q) Quit config
e/n/d/r/c/s/q> q
Googleドライブトークン設定箇所について
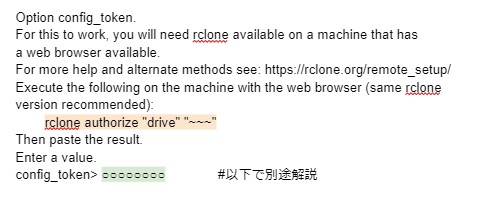
①Rclone設定画面において、オレンジ色の箇所をUbuntuのターミナルに貼り付けてEnter
②表示されたリンク先に遷移、ログイン後「許可」を押下しアカウント認証を行う
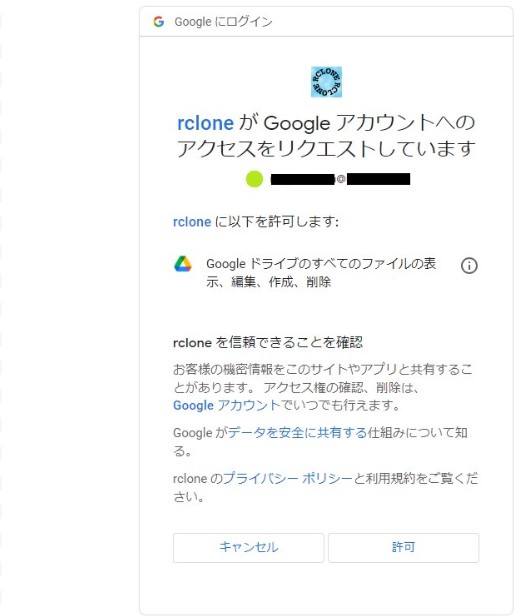
以下の画像のようにSuccess!と表示されたらOK
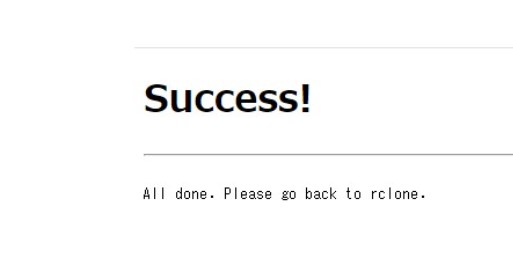
③ターミナルに戻るとトークンが表示されるのでコピー
④EC2に戻り画像緑の箇所に貼り付け
Rclone実行(動作確認)
実行環境(EC2)上で以下のコマンドを実行しS3のバケット内にファイルが保存されていればOKです。
$ rclone copy google-drive:コピーしたいファイルのパス s3:保存したいフォルダのパス例:Rclone実行環境が以下の場合
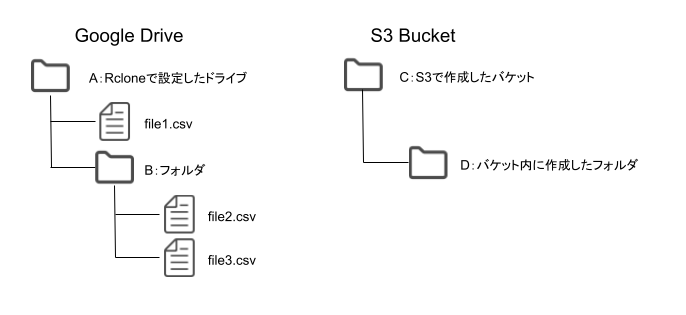
・file1.csvをCフォルダ直下にコピーしたい場合
$ rclone copy google-drive:./file1.csv s3:C・file2.csvをDフォルダ直下にコピーしたい場合
$ rclone copy google-drive:B/file2.csv s3:C/DRcloneの自動化
今回はGoogleドライブからS3、S3からRDSまでの処理を一貫して行いたかったため、Spring Bootの@Scheduledアノテーションを用いてRcloneの処理を記載したシェルスクリプトの実行から、S3 Select、RDSへのデータ取り込みまでを定期実行します。
シェルスクリプトの作成
EC2内の任意の場所に以下のようにRcloneのコマンドを記載したシェルスクリプトを作成します。
sudo vi sample.sh
#!/bin/bash

rclone copy google-drive:○○○○○○○○ s3:××××××
Javaでシェルスクリプトを実行
package com.aws.sample.controller;

import org.springframework.web.bind.annotation.RequestMapping;
import org.springframework.web.bind.annotation.CrossOrigin;
import org.springframework.web.bind.annotation.RestController;

@RestController
@CrossOrigin
@RequestMapping("/sample-api")
public class SampleController {

    @RequestMapping(method = RequestMethod.GET)
    public ResponseEntity<Map<String, Object>> sample() {
        try {

            //ProcessBuilderインスタンスを生成する
            ProcessBuilder processBuilder = new ProcessBuilder("sh",
                    "シェルスクリプトのパス");

            //プロセスを開始する
            Process process = processBuilder.start();

            //プロセスが終了するまでスレッドを待機させる(戻り値は終了コード、0が正常終了)
            int exitCode = process.waitFor();
            System.out.println("Script execution finished with exit code: " + exitCode);

            if (exitCode != 0) { // exitCodeが0以外(Rclone失敗)の場合RDS取り込みはやらない

                System.out.println("Rclone実行に失敗しました。");

            } else { // exitCodeが0(Rclone成功)の場合RDS取り込みを実行

                //S3 Selectの処理を記載

            }

        } catch (Exception e) {
            e.printStackTrace();
        }

        String sample = "s";

        Map<String, Object> map = new HashMap<>();

        map.put("test", sample);

        return new ResponseEntity<Map<String, Object>>(map, HttpStatus.OK);

    }
}
Javaから外部プログラムを実行するProcessBuilderクラスを使用してシェルスクリプトを実行します。
上記のプログラムはスケジュール機能がまだ付いていないため、PostmanからAPIを使用してシェルスクリプトの実行ができるか動作確認を行います。
スケジュールの設定
package com.aws.sample;

import org.springframework.boot.SpringApplication;
import org.springframework.boot.autoconfigure.SpringBootApplication;
import org.springframework.scheduling.annotation.EnableScheduling;

@SpringBootApplication
@EnableScheduling
public class SampleApplication {

	public static void main(String[] args) {
		SpringApplication.run(SampleApplication.class, args);
	}

}
スケジュール機能の利用には機能の有効化が必要になるため、上記のようなアプリケーションファイルに@EnableSchedulingアノテーションを追加します。
package com.aws.sample.controller;

import org.springframework.web.bind.annotation.CrossOrigin;
import org.springframework.web.bind.annotation.RestController;
import org.springframework.scheduling.annotation.Scheduled;

@RestController
@CrossOrigin
public class SampleController {

    @Scheduled(cron = "0 30 12 * * *", zone = "Asia/Tokyo")

    public void sample() {
        try {

            ProcessBuilder processBuilder = new ProcessBuilder("sh",
                    "シェルスクリプトのパス");

            Process process = processBuilder.start();
            int exitCode = process.waitFor();
            System.out.println("Script execution finished with exit code: " + exitCode);

            if (exitCode != 0) { // exitCodeが0以外(Rclone成功失敗)の場合RDS取り込みはやらない

                System.out.println("Rclone実行に失敗しました。");


            } else { // exitCodeが0(Rclone成功)の場合RDS取り込みを実行

                //S3 Selectの処理を記載

            }

        } catch (Exception e) {
            e.printStackTrace();
        }
    }
}
SampleController.javaで定期実行させたいメソッドに@Scheduledアノテーションを追加します。
※@Scheduledアノテーションは引数を取らないメソッドのみに指定できます。
スケジュールの設定方法はいくつかありますが、今回はcron記法のスケジューリング(時間の設定方法については以下”cronとは”をご覧ください)を行っています。zoneはcronスケジュールを実行するタイムゾーンを指定するものです。
cronとは
cron式で指定した時間に指定したコマンドやプログラムを実行してくれるプログラムです。
crontabで実施する際には* * * * * が基礎コマンドになり、左から分、時、日、月、曜日を指します。
※今回使用しているSpringBoot では* * * * * *が基礎コマンドで一番左に秒指定が必要になります。
* は全て指定されているイメージで、時間を指定する際は以下の例のように記述します。
例①)毎日9時半に実行
0 30 9 * * *
例②)毎月5日の9時半に実行
0 30 9 5 * *
まとめ
EC2環境でのRcloneを使用したGoogleドライブからS3へのバックアップ方法と処理の自動化についてまとめました。
設定や実行において、Googleドライブのトークンの部分の設定や、Rclone実行時のパスの書き方など簡単にですが書いてみたので参考になれば嬉しいです。
以下のS3 Select編では、今回RcloneでS3に保存したCSVファイルのデータをS3 Selectを使用して抽出し、RDSに反映するまでの処理について記載しています。
【AWS】Rclone × S3 Selectによるデータ取り込み自動化で効率的なデータ活用を実現!~S3 Select編~
投稿者プロフィール

-
2023年にIT未経験で入社。
AWS、Vue.js、Javaを使用した社内向けシステム開発に1年間ほど携わり、現在はSAPサービスの調査やFioriを用いたアプリ開発に取り組んでいます。
業務を通して得た知識やつまづきやすいポイントを中心にブログ記事としてアウトプットしていきたいと思っています。